Hey guys! I know it's been forever since I've done a post, but just wanted to let you know I've developed a new blog - Feeding Andy!
It's still pretty simple in format (when I have time, I'll spruce it up), but I hope you join me there from now on!

Sunday, May 13, 2012
Monday, May 7, 2012
Secret Recipe Club: Barbecue Chili w/ Corn

Well hello there! It's been about a month since my last post! Trust me, April was a whirl wind of a month. First and foremost - I GOT MARRIED! We went to Vegas for our honeymoon and had a blast! And this past weekend was Derby weekend (which is basically the Black Friday for restaurants around here - it's been CRAZY busy and I'm utterly exhausted!).
Anyway, I'll definitely post pictures as soon as I can.
But the reason we're here right now is to talk about a club. The Secret Recipe Club. One of my favorite blogging groups. It's like a secret Santa for food bloggers. You end up with an awesome blog to pick a recipe and blog about, and in return, someone ends up with your blog, as well! Exciting, huh?
Well this month I got the pleasure of getting Connor's Cooking. Raina has a plethora of great recipes to choose from. Everything from Shrimp Tortellini Pasta Toss to Guacamole. It was a hard decision, but I settled on Raina's Barbecue Chili w/ Corn. It was a quick and easy meal, that made enough to feed us for a few days!
The only changes I made were to use black beans instead of barbecue baked beans and chipotle chili powder instead of regular, but only because I had those on hand already. The recipe was quite tasty and I'll definitely be making it again and again!
Ingredients:
Adapted from Connor's Cooking's recipe
1 lb. ground beef
1 large onion, diced
14.5 oz. can seasoned black beans
14.5 oz. diced tomatoes, undrained
1 cup tomato sauce
1 & 1/2 cups frozen corn
1 tablespoon chipotle chili powder
1 teaspoon ground cumin
1/2 cup shredded habanero cheddar cheese
2 cups corn chips
pickled jalapenos (optional)
salt and pepper, to taste
In a large pot under medium high heat, add ground beef and onions and cook until beef is no longer pink. Drain.
Stir in black beans, tomatoes, tomato sauce, corn, chili powder, and cumin. Bring to a boil and then reduce to a simmer. Simmer for about 10-15 minutes, stirring occasionally, until corn is tender. Season with salt and pepper, to taste.
Ladle chili into bowls and top with your favorite chili toppings. Enjoy!
Hope you guys check out Connor's Cooking and if you're interested in joining the Secret Recipe Club, click here to find out more!
Monday, April 9, 2012
Secret Recipe Club: French Dip Sandwiches

My most exciting time of the month - Secret Recipe Club reveal day!
I had the pleasure to be assigned the blog Mom's Fridge. I've been to Barb's blog before and everything on there is a hodge-podge of comfort food and foods that make you think of home (if you're not already there, of course). You can find things like Ranch-Style Macaroni Salad to Caramel Filled Snickerdoodles. She's got it all!
One thing that stuck out in my head were these French Dip Sandwiches, though. I've just been so busy at work and school that I hardly ever have time to cook anything. So what better way to feel like I slaved over a meal than to throw it all in the crockpot! It's my favorite time-saving kitchen device. So without further delay, let's get to it!
Ingredients:
Adapted from Mom's Fridge
3 lb. bottom-round roast
2 cups beef stock
1 small onion, diced
salt and pepper, to taste
1 teaspoon garlic powder
1 tablespoon olive oil
2 baguettes, toasted
Heat a large skillet under medium high heat and add olive oil. Season meat on both sides with salt and pepper. Sear the meat in the skillet on all sides until you get a nice golden brown.
Place the seared meat into the crockpot and add beef stock, onion, and garlic powder.
Place on HIGH for 1 hour and then reduce heat to LOW for at least 6 hours.
Shred the meat and place on toasted baguettes. Serve with strained broth from crockpot. Dip to your heart's content!
This was a wonderful meal! I just loved dipping the sandwiches into the flavorful broth. This was definitely an easy winner for us!
Want to join the SRC? Check out the site now! And don't forget to check out Mom's Fridge too!
Saturday, April 7, 2012
Blitz Puff Pastry
Hey guys! Those of you who follow me on Facebook probably already know that I'm in a Baking lab this quarter so there's gonna be baking-related posts for a bit! Are you excited?! Alright!
Now this also means that we're going to be using scaled measurements here - I gotta do it in school, so might as well make it a habit of doing in real life! So bust out your digital scales!
Hope you guys are doing well, we're just finalizing all the little details for the wedding (22 days!!) and staying busy - as always.
So puff pastry. Tons of layers, tons of butter. But who has time to fold and turn, fold and turn, fold and turn?! That's where blitz puff pastry comes in. It doesn't quite rise as much as regular puff pastry, but it rises enough for presentation, and it's a whole lot quicker! Let's get to it!
Ingredients:
8 oz. bread flour
8 oz. pastry flour
1 lb. unsalted butter, softened
1/4 oz. salt
8 oz. cold water
 My digital's batteries went out when I started the recipe so I had to bust out my spring scale. Definitely not nearly as accurate as a digital or a balance scale - but you have to be resourceful with what you have!
So now we sift our flours and salt together. You could definitely use a mesh strainer or an actual drum sifter, but our chef said in a pinch, a whisk works just fine too.
Just for fun, let's discuss the 3 purposes of sifting (because let's be honest, when a recipe tells me to sift, I rarely do, based on the shear fact that I'm lazy and don't want to go through all the trouble. Guess this Baking class is going to change my evil ways!)
#1 - to remove lumps - makes sense
#2 - to incorporate air - this is the big one, ever notice that after you sift dry ingredients they seem to amount to more mass? It's the air!
#3 - to create a homogenous mass - another big point. You want your individual ingredients to lose their sole identities to become one happy family.
 And now we're gonna cut in our butter. You want to "crush" the fat into the flour, not "squeeze" it in there. Picture yourself making the "I want money" gesture, not the "I want to choke the chicken". You know what I mean?
Once you have the majority of the big chunks of butter incorporated into the flour, make a well in the center and pour in your cold water.

Use a bowl scraper or wooden spoon to incorporate the dough into the center until it forms a unified mass. Gentle now... we don't want to over work the dough. On a lightly floured surface, form the dough into a rectangle loaf.

Roll dough into a rectangle that is about 1/4 to 1/8 inch thick.

Fold the left and right sides toward the center, leaving a finger-width gap in between.

Then fold the sides together.

Then roll out into a rectangle about 1/4 to 1/8 thick again, and repeat entire process 2 more times.

Wrap up your finished pastry and place in the freezer for at least 8 hours or overnight.
And bam, you'll have puff pastry to use at your own discretion! Next couple of posts, I'll show you what I did with mine!
Hope you all have a great Easter holiday, if you're celebrating. Otherwise, just have a good rest of the weekend =)
Now this also means that we're going to be using scaled measurements here - I gotta do it in school, so might as well make it a habit of doing in real life! So bust out your digital scales!
Hope you guys are doing well, we're just finalizing all the little details for the wedding (22 days!!) and staying busy - as always.
So puff pastry. Tons of layers, tons of butter. But who has time to fold and turn, fold and turn, fold and turn?! That's where blitz puff pastry comes in. It doesn't quite rise as much as regular puff pastry, but it rises enough for presentation, and it's a whole lot quicker! Let's get to it!
Ingredients:
8 oz. bread flour
8 oz. pastry flour
1 lb. unsalted butter, softened
1/4 oz. salt
8 oz. cold water

So now we sift our flours and salt together. You could definitely use a mesh strainer or an actual drum sifter, but our chef said in a pinch, a whisk works just fine too.
Just for fun, let's discuss the 3 purposes of sifting (because let's be honest, when a recipe tells me to sift, I rarely do, based on the shear fact that I'm lazy and don't want to go through all the trouble. Guess this Baking class is going to change my evil ways!)
#1 - to remove lumps - makes sense
#2 - to incorporate air - this is the big one, ever notice that after you sift dry ingredients they seem to amount to more mass? It's the air!
#3 - to create a homogenous mass - another big point. You want your individual ingredients to lose their sole identities to become one happy family.

 |
| The whisk doesn't belong in there (can you tell I'm rusty? Or rushed.) |
Once you have the majority of the big chunks of butter incorporated into the flour, make a well in the center and pour in your cold water.

Use a bowl scraper or wooden spoon to incorporate the dough into the center until it forms a unified mass. Gentle now... we don't want to over work the dough. On a lightly floured surface, form the dough into a rectangle loaf.

Roll dough into a rectangle that is about 1/4 to 1/8 inch thick.

Fold the left and right sides toward the center, leaving a finger-width gap in between.

Then fold the sides together.

Then roll out into a rectangle about 1/4 to 1/8 thick again, and repeat entire process 2 more times.

Wrap up your finished pastry and place in the freezer for at least 8 hours or overnight.
And bam, you'll have puff pastry to use at your own discretion! Next couple of posts, I'll show you what I did with mine!
Hope you all have a great Easter holiday, if you're celebrating. Otherwise, just have a good rest of the weekend =)
Friday, March 23, 2012
How-To: Boil Water

Hello again! Remember me? It just seems like my breaks between posts keep getting longer and longer, don't they? But I promise I'll always return!
Anyway, we're down to 36 days until the wedding! Can you freakin' believe it?! Just yesterday, I could remember it being ages away (like 2 years away!). And it's coming up quickly. We pretty much have everything taken care of, just need to make the final payments on some things and we'll be good to go.
I'm in between quarters at school (next quarter starts Monday - BAKING! - so expect a bunch of baked goods in the near future) and catching up on some spring cleaning, so I haven't done much cooking - especially since life is crazy busy! I know the title of this post may deter some of you, I mean, hell... shouldn't we all know how to boil water? Believe it or not, I've actually seen a lot of people that do this incorrectly! Take my lovely other half, for instance. I find him putting the pasta in the pot, covering it with water, and THEN putting it on the stove. I can even admit that I'm guilty of this every now and then. A lot of people think that it's faster to do it that way, but honestly - it just wastes more time!
So this isn't necessarily a "how-to" per se, but more of a post of tips. So let's get to it!
1. Starting with cold water, put enough water into a pot to cover whatever you'll end up boiling (i.e. pasta). Bring water to a boil over high heat. Add salt to season.

2. Add your desired food to the water (in my case, pasta). The temperature will drop when you add the food, so you'll want to keep the heat on high to bring it back to a boil. Then reduce the temperature, as needed, just to maintain a boil.


3. Cook the food until it reaches your desired texture/doneness.
You want to serve boiled food right away, unless you plan on shocking it after (placing in ice water).

I know this may have seemed like a pointless post to some of you, but I've come to learn that the little things are what make your meals amazing. Whether it be properly heating up a saute pan, bringing water to a full boil, or even something as simple as adding a pinch more salt to something. It's the little things that don't get the credit, but it's also the little things that bring something from "meh" to "wow, what's your secret?!"
Hope everyone has a great weekend! I've got to work at the restaurant tonight, but I've got the whole weekend off. Andy and I are planning on being lazy - but that never works out! See you guys in a few days =)
Friday, March 9, 2012
Country Ham & Manchego-Stuffed Chicken Breasts

Howdy!
The wedding countdown is on. Less than 2 months away, we're starting to chip at what we have left to do bit by bit. The past week or so, my engagement ring has been at the jeweler's in order to get the bands molded. I almost feel naked without it! Like men are just gawking at me like I'm a single woman. Hehe, I'm pretty vain aren't I?
The end of this quarter of Culinary School is almost upon us. And I'm definitely ready for the break. The middle of the month is also my last day at my day job at the pharmacy. I've worked there for 7 years and it'll be hard to say good-bye. But I know I've been lifelong friends and it won't be good-bye to those people. But it also marks the day I'll be moving on. Really getting on. I'll be able to work at the restaurant more, especially since I'll be switching to Day-time classes for the next quarter. Nights and weekends were alright, but I'd be there double the time. Day-time classes allow me to finished faster (and cook more!) - as well as being able to work at the restaurant more often.
But all in all, everything is great - except for the fact I've cut myself twice in the past two weeks. Once on my pinky (sliced the sucker right open) while cleaning my knife - and the second time was just this past Sunday at work - with a bread knife. Not pretty. And by the time I went to the Immediate Care Center (my stubborn ass went the next day instead of right after work), it was too late to get stitched up. So I'll just have to suffer with the battle wounds for now.
Anyway, this is an easy weeknight dinner that's tasty and quick! Let's get at it!
Ingredients:
2 chicken breasts, boneless and skinless
2 pieces of country ham
2 slices of manchego cheese (or cheese of your choice)
1/4 cup flour
salt and pepper, to taste
2 tablespoons grapeseed oil (or olive oil)
Preheat oven to 375 F.
Wrap your chicken breasts loosely in plastic wrap. You want it loose enough that they'll be able to comfortably expand, but not too loose that they're "expand" in little pieces all over your kitchen when you smack the crap out of them.

Take a meat mallet or bottom side of a pan and get to smacking. Flatten the breasts to about 1/4 to 1/2 inch thickness.

Remove plastic wrap from chicken breasts.

Place a piece of country ham on chicken breast.

Place a piece of manchego cheese on top of country ham.

Using butcher's twine or toothpicks (these are more ideal), wrap the chicken breast around the ham and cheese. If I had toothpicks handy, I would have used those, but the twine sufficed.

Place the flour in a shallow dish. Season with salt and pepper. Dredge the chicken in the flour, shaking off any excess flour.

Heat the oil in an oven-proof skillet under medium high heat. Place the chicken in the pan, seam-side up. Cook chicken until you get a nice golden crust, about 3-4 minutes. Flip chicken over and cook for an additional minute.
Transfer chicken to the oven to finish, about 10 minutes or until internal temperature reaches 165F.

Serve chicken with barbecue sauce (or sauce of your choice) and side of your choice. We paired this with macaroni and cheese for a nice comforting meal!

Monday, March 5, 2012
Secret Recipe Club: Cranberry Salsa Dip

It's my favorite time of the month! Secret Recipe Club Reveal time!
This month, I was assigned the blog I Was Born To Cook. I wasn't familiar with this blog, but I found tons of great things - and Melissa is definitely true to her blog's name - she was born to cook!
I've been on a cranberry kick lately (I know they're a tad out of season, but hey, I've never been one to let that stop me from feeding a craving!). This Cranberry Salsa was the perfect lazy Sunday snack. Both Andy and I found ourselves going back for more - this definitely will be on rotation when we have a snack craving!
The only change I made was that I used dried cranberries, and just rehydrated them in some apple juice for about 30 minutes. Also I omitted the sugar and the jalapenos (mostly because I forgot that they were on the ingredient list, but the dip tasted just fine without them, although next time I definitely will not be forgetting the jalapeno - we could all use a little spice in our lives!)
Ingredients:
Adapted from I Was Born To Cook's Recipe
1 cup dried cranberries
1 & 1/2 cups apple juice
juice from 1 lime
1/4 cup cilantro
2 green onions, chopped
salt, to taste
8 oz. cream cheese, softened
Place the cranberries in a small bowl and pour apple juice over top. Let sit for at least 30 minutes to rehydrate. Drain.
In a blender (I've been experimenting with my new Magic Bullet - it actually is pretty awesome), combine the cranberries, lime, cilantro, green onions, and salt. Puree until you reach your desired consistency.
Place the cream cheese on the center of a plate. Spread the cranberry mixture over top and serve with crackers. Prepare to get your snack on!
Like I said, this was an awesome dip, just different enough to make you say "Wow!" I'll definitely be checking out Melissa's blog from now on because she's always coming up with tasty eats!
Want to join the Secret Recipe Club? Check out the website now! Be paired off with another "Secret" blogger and enjoy the fun of seeing someone recreate a recipe of yours as well! All the cool kids are doing it =)
Friday, February 17, 2012
Crab-Stuffed Salmon w/ Corn Red Pepper Relish, Garlic Mashed Potatoes, & Lemon-Thyme Beurre Blanc

So maybe that title could have been a little bit shorter, eh? I just wanted to make sure I had your attention!
This was, by far, one of the best meals that has ever been cooked in this household. Andy DEVOURED this plate. Seriously, I've never seen such a constant smile on his face after eating a meal. You just know it's gotta be a winner then!
Before we get into anything... how are you guys?! I know I'm sporadic in my posts, but I try to do one at least every other week. Things are just getting crazier and crazier! School, work, school. And this week I helped make hors d'oeuvres for a fundraiser that the restaurant on campus is holding tonight. I made some sweet potato biscuits and sandwiched in between them are some fig preserves, country ham, and manchego cheese. DELICIOUS. Hopefully they'll be a hit tonight!
Anyway, let's get to some salmon. Don't be weary about the seemingly long list of ingredients. Everything comes together quite quickly (less than 45 minutes) if you have everything prepped and ready when you need it!
Salmon:
2 - 8 oz. salmon fillets
1 cup lump crab meat
3 garlic cloves, minced
2 tablespoons fresh parsley, minced
juice from 1 lemon
salt and pepper, to taste
Corn-Red Pepper Relish:
1 red bell pepper, seeded and julienned
1 tablespoon olive oil
1 cup fresh or frozen corn (I used shoepeg because Andy loves shoepeg, but sweet yellow would be great too)
2 scallions, thinly sliced
2 garlic cloves, minced
juice from 1 lemon
1 tablespoon honey
2 tablespoon fresh parsley, minced
Garlic Mashed Potatoes:
5 medium-sized yukon gold potatoes, peeled and diced
1/4 cup garlic cloves, peeled
salt and pepper, to taste
1/4 cup heavy cream
1/8 cup sour cream
3 tablespoons unsalted butter
Lemon-Thyme Beurre Blanc:
1/2 cup white wine
1 small shallot, minced
3 sprigs fresh thyme
juice from 1 lemon
8 tablespoons cold unsalted butter, cut into tablespoon pieces
salt, to taste
Like I said, don't be scared! Everything is super easy, and you don't necessary have to have all the components - but I promise you, if you do... it'll be one hell of a knock out dinner if you're trying to impress someone special!
So first, let's prep the crab stuffing. Super easy. In a medium bowl, combine the crab meat, parsley, lemon juice, and garlic. Season with salt to taste, and bam. You've got crab stuffing.

Now let's stuff out salmon. But first we have to cut a slit down the middle of each fillet. You don't want to go all the way through, maybe leave anywhere between 1/4 to 1/2 inch on the bottom.

Place about 1/2 cup of the stuffing in the slit (and on top of the salmon).

Place in a container and cover with plastic wrap. Place in the fridge until ready to use.
Now we can make our mashed potatoes and relish at the same time. (But for ease, I'll describe each one separately).
Preheat oven to 375 F.
Place the potatoes in a medium pot and cover with water. Bring to a boil and cook until tender, about 10-15 minutes.
Place the garlic in a small roasting dish and toss in olive oil. Season with a little bit of salt. Roast in the oven for about 20-25 minutes, or until garlic is golden and soft. Let cool.
Drain the potatoes and add roasted garlic, sour cream, butter, and heavy cream. Mash until you've reached your desired consistency. Season with salt and pepper, to taste.
For the relish, add a little bit of olive oil to a large saute pan and heat under medium high heat.
Add corn and scallions, cook for about 2-3 minutes.

Then add red bell pepper and garlic. Cook until pepper is slightly softened, but still has a bit of a bite, about 2-3 minutes.

Turn off heat and stir in parsley.
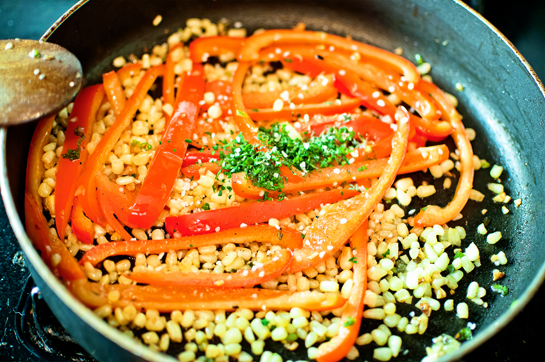
Place mixture in a medium bowl and add in lemon juice and honey. Season with salt and pepper, to taste.

Now we can make our sauce while the salmon is cooking (hope your oven is still at 375!)
Place the salmon on a baking sheet and bake for about 18-20 minutes, or until at your desired doneness.
In a medium sauce pan, add shallots, thyme sprigs, and white wine. Place under medium high heat and reduce wine by about two-thirds.
When wine is reduced, slowly add in one or two pats of butter at a time, whisking constantly to form an emulsion. Don't add any more butter until the last bit of butter is almost emulsified. Continue adding butter until all is incorporated.
Whisk in lemon juice and season with salt, to taste. Strain mixture through a fine mesh strainer. (A great video on a beurre blanc is this one - so versatile, add whatever aromatics/flavors you desire)
To plate your final dish, first make sure all of your components are warm. If you did this all at once, everything should still be okay (if not, nuke it in the microwave for 30 seconds and you're good to go!).
Place about 1/2 cup of mashed potatoes on the center of the plate, slightly flatten out. Place salmon on top, slightly to the right or left of center (in other words, not exactly in the center, hehe). Place a small handful of the relish next to the salmon and drizzle the beurre blanc around the plate and a little bit on top of the salmon, as well. And voila... a plate designed to impress and satisfy any seafood-hungry stomach!

Hope you guys have a great weekend and see you soon =)
Monday, February 6, 2012
Secret Recipe Club: Kale Chips/Fries

It's been a bit since I've done a Secret Recipe Club (the club took the month of January off), but it's one of my favorite things to do! And my most consistent post =)
Of course, being as busy as I am, I had to pick something easy, quick, and tasty! So after perusing the blog Cook Book of Trial and Error, it was definitely a hard choice! There were so many tasty and quick options, but I figured I could pick something I could serve at my Superbowl party, as well!
These Kale Chips/Fries were a healthy option among all the calorie-laden foods was a welcome surprise to guests. I found myself snacking on these quite a bit last night!
Ingredients:
Adapted from Cook Book of Trial and Error's recipe
1 bunch of kale, stems removed
1 tablespoon grapeseed oil
Steak seasoning, to taste
My only changes were to use grapeseed oil (I've been using it as a replacement for olive oil lately and I love the cleaner taste!) and to use steak seasoning for an added punch!
Preheat oven to 350 F.
Line a baking sheet with parchment paper and spread kale in an even layer. You may even want to divide it into two sheets like I did (it was a huge bunch of kale).
Bake in oven for about 10 to 15 minutes, or until chips are nice and crisp.
Season additionally, if desired.
It's always fun to do the Secret Recipe Club! Want to join? Visit the SRC website now to find out how!
Friday, February 3, 2012
Coq au Vin

Yes, it's me again. Took a little bit of a hiatus, didn't I? I'm telling you, life. Life does funny things. Keeps you busy. Keeps you sleepy. Doesn't necessarily keep you bloggin'. But thanks for sticking around...
Anyway, Coq au Vin. A classic French dish, but how in the hell do you pronounce it? I swear I was one of the only people in my Culinary lab to have even heard of it before. It almost was annoying having to repeat it over and over again after people asked what I was making. But regardless... it's "Coke (in a nasally kind of tone)-O-Van (again, nasally!)".
Now that we've gone over how to say it. What the heck is it?!
The literal translation is "Cock of the wine" (no giggling all of you immature folk, hehe) - but we can use our common sense and say it's "Chicken cooked in wine."
One of the biggest mistakes when making Coq au Vin is that people end up with "purple chicken." You don't want purple chicken. It's just not natural. So the best way to avoid purple chicken, you ask? Get a good coating on your chicken in the first place. And don't go overboard on the wine. If you want to go overboard on it, don't put it in the pot, put it in a glass and drink it. Deal? Okay, let's get to it!
Ingredients:

1 whole chicken, broken down into 8 pieces
flour, as needed for dredging
salt and pepper, to taste
2 T unsalted butter
4 T Brandy
Bouquet garni (the following wrapped in a cheesecloth) made of:
4-inch carrot stick
4-inch leek, split in half
1 sprig of thyme
1 bay leaf
3 garlic cloves, peeled and crushed
1 cups red wine
2 cups chicken stock
2 pieces of bacon, chopped into 1/4 inch pieces
18 pearl onions, peeled
10 button mushrooms, quartered
Season the chicken pieces with salt and pepper.
Place the flour in a shallow dish and dredge each piece of chicken, shaking off any excess. You want to get a good dredging because ideally, the flour that ends up on your chicken will ultimately be what thickens up your sauce throughout the cooking process.
In a large dutch oven heat the butter under medium high heat. Add the chicken, in batches, and cook until both sides are browned nicely. Set the chicken aside on a plate.
Add bacon pieces to dutch oven and cook until fat is rendered and bacon is crispy. Drain all but 2 tablespoons of fat from pot. Add the brandy and ignite. Cook until flame dies out.
Return chicken to pot and add bouquet garni, garlic, wine, and chicken stock. Bring to a boil and then reduce to a simmer. Cover and let simmer for about 45 minutes to an hour. Or until chicken is tender and sauce is thickened.
About 20 minutes before ready to serve, add in pearl onions and mushrooms.
Season with salt and pepper.
We served this over some butter sauteed egg noodles and it was just the perfect pairing.

I know there hasn't been much of a winter (or at least in my part of the world), but this would be the perfect dish to curl up on the couch with and get warm. It's comfort in a bowl, I tell ya. The chicken is tender and falling off the bone. The sauce is rich, yet delicate.
Hope everyone is doing well, I know I am, albeit busy as hell! Have a great weekend guys!
Friday, January 13, 2012
Latkes a.ka. the Potato Pancake
This past weekend was our first culinary lab of the quarter. My group was assigned to do a Greek Salad and some Latkes (or fried potato pancakes). And for this quarter, our lab is not only responsible for feeding ourselves, but also a few other labs (so about 60-80 people).
Our group of three was already one short, so there was just the two us. We decided to each tackle one recipe and help eachother out in between. I ended up with the latkes. Now, any time you make something fried, ideally, it's best to serve right away. Well, remember that whole 60-80 people that we were serving? Practically impossible to fry up about 60 people's worth of latkes and keep them all perfect. I know there are probably people that CAN do this, but for a second quarter culinary student? I'm good, but not THAT good... yet.
What I'm getting at is, I got some voiced criticism from someone in one of the other labs that we were feeding. "Those just don't look appetizing" was the comment, I believe. You're going to get criticized no matter what setting you're in, so I take things like that with a grain of salt and learn from them. I was really surprised when a couple of my classmates stepped up and said that the girl was really rude in the way she said it and stood up for me. It was good to know that they had my back, and most of them even told me the latkes were great and that girl didn't know what she was talking about. Either way, it felt good to be supported.
But after getting home, it really struck a nerve with me. Maybe she was right, maybe they didn't look appetizing. I was determined to come up with a latke that looked and tasted amazing. And so, this trio of tuna dinner was born.
I must warn you, there are A LOT of pictures in this post. But I figure, if I'm not posting as often, I might as well give you guys ample eye candy, right?
Ingredients:
Latkes
1-2 New Potatoes
1/2 small onion
1 egg, lightly beaten
1 teaspoon baking powder
1 tablespoon flour
salt and pepper, to taste
vegetable oil, for frying
Tuna-Wrapped Asparagus
2 stalks of asparagus, cut into 2-inch pieces
2 one inch piece of sushi-grade Ahi Tuna
1 tablespoon lime juice
Sesame-Encrusted Ahi Tuna
2 6 oz. pieces of sushi-grade Ahi Tuna
1 cup breadcrumbs
1/4 cup black sesame seeds
salt and pepper, to taste
1 tablespoon olive oil
3 asparagus stalks, shaved thinly with a mandolin
1/2 large zucchini (or 1 small zucchini), shaved thinly
1 tablespoon lime juice
Strawberry Soy Sauce
1/4 cup soy sauce
1/4 cup water
1 cup strawberries, sliced
1 teaspoon sugar
Spicy Tuna Tartare
4 oz. sushi-grade Ahi Tuna, cut into 1/4 inch cubes
2 tablespoons Sriracha, or to taste
Sesame oil, to taste
There seems to be a lot of ingredients up there, but I promise as long as you have everything in place and ready (a.k.a. mis en place), then it will come together in no time. And it's an elegant meal, that is just too simple that it's fool proof!
So let's start with the latkes. Make sure you have a bowl of salted cold water for your potatoes so that they don't oxidize and turn brown on you.

Then you'll take your star ingredients, the potato and the onion.

Peel your potato (or potatoes if you're using more than 1) and have a grater ready.

Shred that potato and immediately put into the bowl/container with cold salted water. Set aside.

Then quickly small dice your onion and set that aside, as well.

Moving on to the tuna... make sure to whip out a separate cutting board - we don't want any cross-contamination here! And I can't stress this enough, make sure you get SUSHI-GRADE Tuna! It's been processed in a way that it is "safe" from parasites and bacteria - however, you eat raw fish at your own risk. If it's not labelled as "Sushi-Grade", then double check with your fish monger for sure!
 |
| Ain't she a beauty?! |
Get a large bowl and fill it with ice. Then you'll want to cut the skin off of the Ahi. With a boning knife, carefully cut away the outer skin. Then from the wider side (the left in the picture), but out two 1 to 1 & 1/2 inch wide portions for your Sesame Encrusted Ahi. Wrap in plastic wrap and place over ice.
Then cut two 1-inch cubes from the remaining Ahi. Place the cubes between plastic wrap and using the flat side of a mallet (or bottom of a small saute pan, hehe) and gently pound the cubes flat. Wrap in plastic wrap and put over ice.
Then with remaining Ahi, dice into small 1/4 inch cubes. Place in a small bowl and drizzle with Sriracha and a dash of sesame oil. You can make it as spicy as you like, so be liberal with the Sriracha. Mix well and chill until ready to use.
Let's move on to our vegetables.
Fill a medium pot half way with water and bring to a rolling simmer. Have a medium bowl of ice water ready as well.
Blanch the asparagus in the water for about a minute and quickly shock in the ice water (to stop the cooking process). This will give the asparagus a vibrant green color, as well as keeping it's tender crunch. Don't worry about blanching your zucchini (unless you really want to)... I rather like the taste of raw zucchini, just make sure you wash it well before you slice it. Your vegetables should look like this.

Then go ahead and get your breading for your ahi portions ready. In a small container, combine the breadcrumbs and black sesame seeds. Season with salt and pepper, to taste. Set aside.

Now let's make our sauce for the Ahi. Place the soy sauce, sliced strawberries, water, and sugar in a small saucepan and bring to a boil. Reduce the mixture by half, or until thickened to desired consistency. Puree mixture then strain through a fine mesh strainer or chinoise. Set aside.

Unwrap Ahi portions and roll in the breading until fully coated.

In a medium heavy-bottomed pan, add enough vegetable oil to cover the pan by 1/2 an inch and heat under medium high heat.
Drain potatoes from water and squeeze out and excess water retained by the potatoes. Pat dry with paper towels.
In a small bowl, combine the shredded potatoes, onions, egg, baking powder, and flour. Season with salt and pepper. Mix well. Honestly, I probably could have used a little more potato or a little less egg - it was very egg-y. But tasty, nonetheless.

Fry the latkes in the oil until crispy and golden brown, about 2-3 minutes per side. Let drain on a paper towel-lined plate. Then, using the open end of a drinking class (or the reasonable option would be to use a cookie cutter), cut a nice even circle out of the latke. Then eat the edges, because they're delicious. But don't spoil your dinner.

Let's saute our Ahi portions now. Heat a medium skillet under medium high heat and add about a tablespoon of olive oil.
Add Ahi and cook each side for about 30-45 seconds, just to sear slightly and get a nice golden brown crust. Place on cutting board and slice into 1/4 inch pieces.

Remember those pounded out tuna cubes? Unwrap them and get one of your blanched pieces of asparagus. Wrap the asaragus with the tuna and place them seam side down on the plate. Drizzle with a little bit of lime juice and lightly sprinkle some salt over top.

Then we'll plate the sliced Ahi. Place a few pieces of the thinly shaves asparagus and zucchini the plate. You can be playful with it, they're flexible, but just make a little "nest" if you can. Drizzle the vegetables with some lime juice and sprinkle with a tiny pinch of salt. Place the slices Ahi over top and drizzle with Strawberry Soy Sauce.

Then get your tartare from the fridge. Place the crisp latke on the plate as your final component. Top with a heaping mound of spicy tuna tartare. Garnish with a couple pieces of sliced scallion.

And voila! An elegant dish, but after broken down into steps, really isn't that complicated! And although the latke wasn't the star, it was definitely a unique component to the dish. And if I didn't make it look appealing in this, then I might as well give up! But I think I did a pretty good job, don't you think? =)
Well, I know this was a long post, but I'm glad you stuck around to read it (or skim it - I don't care, as long as you're still with me!). Have a great weekend guys, and I'll be back sometime next week =)
Subscribe to:
Posts (Atom)